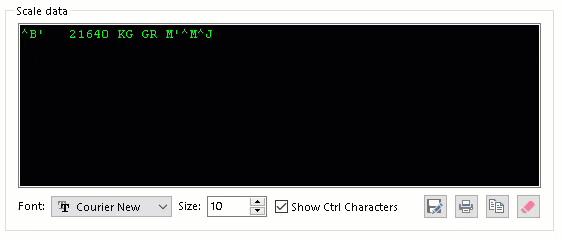
Example of continuous data
If you want to acquire a scale weight directly from your scale (your Truck Scale for example), your scale must be connected to a Digital Weight Indicator and the digital weight indicator must be connected to your computer.
This is normally done by connecting the digital weight indicator to an RS232 serial port on your computer (known as COM port in Windows) or an Ethernet connection on a router or network switch.
While this how-to talks about stand-alone digital weight indicators, the information applies to bench scales, floor scales, laboratory balances and platform scales too.
Of course once your scale is connected to your computer you will need software to read the data from the digital weight indicator.
Example of continuous data
Your indicator must be capable and configured to send weight data continuously (often called streaming or stream mode) or on request (demand mode). Sending the data continuously (streaming), in our experience, is the preferred mode as it is easiest to debug.
While it may be capable, your indicator may need to be configured so that it will work as required.
Your indicator should not be configured so that the scale operator has to manually cause the indicator to send data (e.g. by pressing the Print key).
The RS232 serial port (known as COM port in Windows) remains the most common way to connect a digital weight indicator to your computer.
The digital weight indicator must have an RS232 serial port that is compatible with the PC you are using. If it does not:
If your indicator has a 9-position pin connector it might be a serial port. It could also be a load cell connector! Unfortunately, nothing can be taken for granted.
If it is labeled and the label indicates it's RS232 or serial, you're in luck. All you need to know now is is the port configured as DTE or DCE. In our experience it will likely be be DTE.
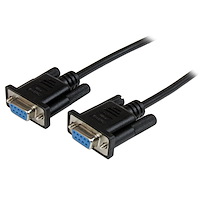
If it is is DTE (pin 3 is transmit/TxD) purchase a null modem cable that has socket connections on both ends. Connect one end of the cable to the indicator and connect the other end to the computer.
If it is is DCE (pin 2 is transmit/TxD) purchase a straight through cable that has socket connections on both ends. Connect one end of the cable to the indicator and connect the other end to the computer.
If the port is not labeled and you can't locate documentation that tells you what the 9-position port is for, consult your scale service provider before connecting it to your computer.
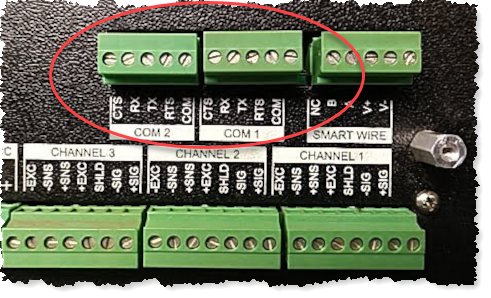
More often than not, the end that connects to the digital weight indicator is not a 9-position connector. The connection is hardwired to a terminal block within the digital weight indicator. In the example below, the digital weight indicator has terminal blocks for the 2 available serial ports which are labeled COM1 and COM2.
The interface cable that connects the indicator to the computer is normally custom made and installed by your scale supplier or can be installed by a service technician that maintains your scale.
If your scale indicator has never been connected to a PC, contact the service provider that maintains your scale and ask them to have an interface cable installed.
If installing the cable requires you to open the digital weight indicator, think twice. This will expose you to the possibility of electrocution, and not only that, you might do serious damage to the digital weight indicator that will be far more expensive to repair than the cost of calling in a service technician.
The end of the cable that connects to the computer should have a connector that is compatible with the computer. In most cases, this will be a 9-position socket connector.
Using the example show in the image above and assuming the digital weight indicator transmitting data continuously, the terminal marked TX would be connected to pin 2 on the 9-position connector and the terminal labeled COM would be connected to pin 5.
If the indicator can only transmit data on request, the terminal labeled RX needs to be connected to pin 3.
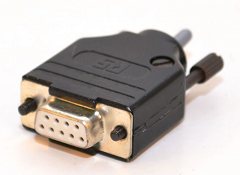
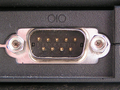
Last but not least, your PC will need RS232 serial port. In most cases, the serial port will be a 9-position pin connector.
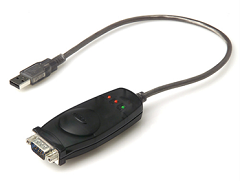
Most new, off the shelf computers (especially laptops and notebooks) will not have an accessible serial port so you will need a USB-Serial adapter or Ethernet-based serial port server.
The simplest choice is a USB-Serial adapter like this Belkin F5U409 Adapter. The adapter has a USB-A connector on one end and a 9-position pin connector on the other.
Before you connect the indicator to the 9-position connector, plug the USB-A connector into your computer and let Windows install the device driver software that is required to allow the adapter to operate correctly.
If the device does not install automatically, you may need to install device drivers from a CD or download them from the device manufacturer.
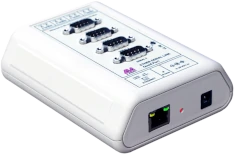
The other alternative is a Ethernet-based serial port server. If the computer is located more than 30m/100 feet from the digital weight indicator, the serial port server is a good choice. If you need to connect any more than 2 scales to your computer a serial port server is an excellent choice.
If you are having a PC custom built for you, ask the builder to install a serial port for each of the digital weight indicators you plan to use.
It is becoming more common digital weight indicators and electronic bench/platform/lab scales to support Ethernet.
If you are using Ethernet (and either TCP or UDP), we will assume the indicator has an RJ45 connector and you can use generic off the shelf CAT5 or CAT6 cabling. Select the cable that is appropriate for your network hardware, connect one end to the indicator and one end to a switch or router and you're done.
If you must connect the indicator directly to your computer you may need a crossover cable or crossover adapter.
The critical part of the Ethernet configuration is assigning the indicator an IP address and port number. You need to be sure the indicator is on the same IP network as the PC and that the port number is available or your software will be unable to make a connection to the indicator.
You should always assign a static IP address to the indicator making sure it's valid for the network your PC is connected to and that it's not in the range that may be used by your networks DHCP server. Don't allow the indicator to be assigned an IP address by DHCP.
Scale for Industry for over 100 years—1924-2025


“Scales for Industry Since 1924”
Copyright © 1997—2025, Canadian Scale Company Limited. All Rights Reserved.
Last modified: Monday, 25-Jul-2022 09:04:31 EDT
Server: 64.68.203.174